
The gallery on this page shows a collection of my digital art projects. If you are interested in any of them, as a professional artprint on paper or canvas, send me an email and I can give you the details about available sizes and prices (prices vary depending on the desired size of the print).
Many a heated discussion has been held about the authenticity of photographs altered with a digital program. My opinion is simple: adjustments to photographs similar to those done in the dark room of old, are totally acceptable to me. As good as digital cameras are these days, the images they produce always need sharpening and possibly a change in things like the white balance, the colour balance and the cropping. If the sensor was dirty and produced spots on the image, I consider it the duty of every serious photographer to remove them digitally.
I will even go one step further. If the scene could not be captured without some small distractions, it is acceptable to me to remove these distractions digitally. This, to me, is no different than the work that we did in the ‘olde’ times, in our darkroom.
However, completely altering an image and claiming it was taken ‘through the lens’ and not mentioning that, feels to me like diminishing the integrity of the photographer. Personally, I love to use digital tools to create special projects that are very obviously manipulated. In the video gallery below I have collected a number of mixed projects that can only be achieved with the used of a digital tool.
Having these tools, makes getting an image the way I wanted to compose it IN the camera an interesting challenge. And a source of great pride when it works out. Let me tell you a little bit more about that, with the use of some of the successes I am very content with.
Moontail
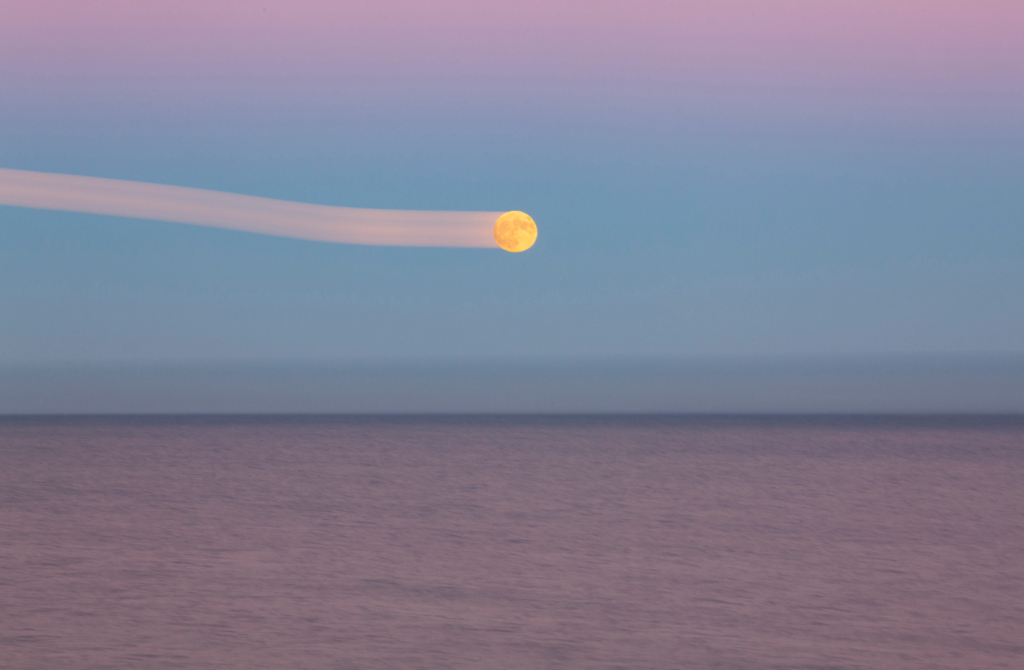
This image cannot be captured ‘in camera’. Moontail is a combination of 2 shots. Part 1 was the moontail and its surroundings. Moonlight is incredibly bright, but on this particular November evening light was already fading. The logical consequence is this: the camera will need longer to capture a well exposed image. And that extra time gave me the opportunity to drag the camera from left to right while the lens was open. I tend to do this on a tripod, so that the horizon remains a horizontal plane during the dragging. This dragging helped create the ‘tail’ and a slight unsharp and soft lake surface, that indicates movement of the water.
The second shot was a close-up of the moon itself, also taken on a tripod to ensure sharpness. To expose the craters in the moon correctly, you need an shutter time of only 1/11 of a second, with a aperture of 11. For none technical folk: this is quicker than an eye blink! Never underestimate the brightness of a full moon: if you let the camera decide, it will look like a bright spot without any texture.
Both images were then combined with a digital tool.
Harvest moon
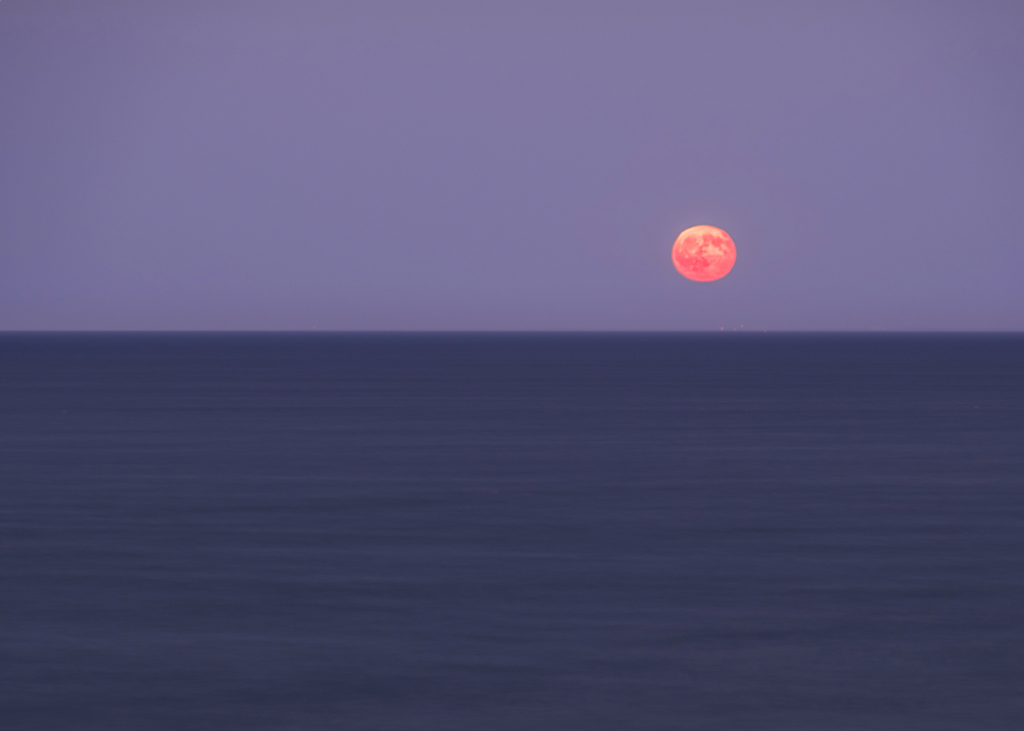
The ‘Harvest moon’ shot was created on another early evening when an extremely big moon was in the forecast and like the previous one consists of two merged shots. I have apps on my phone that tell me exactly what the coordinates will be for the moon rise. It is easy to miss without such a tool. The first part of the shot was exposed for the lake. Much like the previous shot, it was dark enough to drag the camera to make the lake and the sky look fluffy and soft, without sharp details. The second was focussed on the moon, on a tripod to prevent motion blur, without zooming in. That took care of getting details and colour in the surface of the moon. The two together, both taken with a tripod, were then combined using a digital tool.
Not typical digital art projects…
I don’t consider these two examples classic digital art projects. The scenes were exactly like they looked to the naked eye, with the exception of the moontail. As humans we see more with their brain than with they eyes. Our brain is the most fantastic camera in existence… It makes sure everything is properly exposed, something even the best camera cannot do (yet). So trying to capture what we see, in the way we want to present it, we need to know our camera’s features and some proficiency with digital tools. The best one for years is Photoshop. Do not confuse it with Light Room, which has much more limited features. You need Photoshop for these types of projects.
An experiment for you!
If you want to see how your brain processes light and dark in a scene, try the following experiment:
Find a beach at the ocean or at a lake. On a very bright day, stand at the edge of a sandy beach or a similarly overly bright foreground. Close your eyes for a minute. When you first open them, try to be extremely aware of what happens with your vision. You will notice that, for a millisecond, the image you see is completely over-exposed. Then, you will notice that the brain equalises the light and you will see a perfect postcard picture. What we do with manual settings and post production with digital tools, is what our brain does.
The other projects in the video gallery below are very clearly manipulated, with creative intent. Sometimes this means going shopping for components of the final picture, which is what I did with the flying horse. The background comes from sunsets in Bermuda. The wings belong to a young swan. And the horse used to belong to me…
Watching the slideshow
Click on the red arrow in the image below to start the slideshow. If you enjoy background music, make sure the sound is on. The video can be viewed directly on this page, and you can maximise it to your screen by clicking on this symbol in the right bottom corner:

Alternatively, you can click on ‘YouTube’ to watch it in your browser.
Enjoy!